Making a stem from a piece of rod, whether acrylic or vulcanite, isn't all that hard. It does take practice and patience, so don't give up if your first attempts aren't what you were hoping for. A mistake on a stummel can usually be fixed by altering the shape or the finish or whatever, but with stems a mistake tends to lead to starting over.
Before trying to make a stem you have to know what you want your result to be. I suggest looking at your own pipes and really studying the stems of those you enjoy smoking the most. Study the shape, measure the thickness, look at the way the air hole is done, and the shape of the buttons. Go to a pipe show and look at the stems of pipes that have a reputation for smoking well. Ask others what qualities they look for in stems. Once you have a good mental picture of what you want your result to be you are ready to begin.
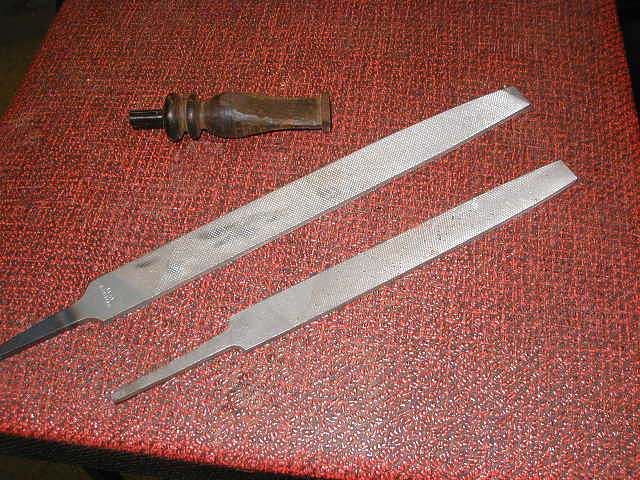
After you have your stummel you need to determine the length of stem you feel will suit it. Here I have cut a piece of cumberland rod and in the second picture I am cleaning the rod up and making sure it is straight and round. Always a good idea because rod stock is rarely perfectly round or straight and if you don't true up the rod with the lathe your drilling can be off later.


I start drilling the air hole from the tenon end of the stem. The first picture shows me starting the air hole with a short 1/8 inch acrylic bit. Second picture shows long 1/8 bit which I will use to drill up to about 7/8 inch from the other end. I then use a tapered 5/32 bit to open the air hole up more and get the taper I want at the button end of the stem. Always take your time with drilling, especially in acrylic, and back out often to clean the bit and let it cool if necessary.


Here I have turned the stem around and will be drilling the air hole from the button end with a 1/16 inch acrylic bit. The two holes should meet perfectly and the truing up of the rod stock done at the start will pretty much ensure that they do. In the second picture I am squaring up the button end of the stem.


Next I do some turning to get the basic fishtail shape of the stem.

Turn the stem around again and get ready to turn the tenon. Take your time and measure frequently with a micrometer while turning the tenon. I like to leave the tenon slightly oversized because sanding and polishing will change the size. For example, I often use a tenon size of .278 inches and I will turn my tenon down to .280. Next I put a slight bevel on the end of the tenon to match the bottom of the mortise hole. Now is also a good time to turn any decoration you might want on the stem. You can see I did two turnings on this stem. Also while the stem is turning on the lathe you can take care of some of the sanding. For the tenon I use 400 grit and a light touch. I also sand the decorative areas I just turned starting with 150 grit and moving up to 400 grit.

The lathe part of the stem is now finished. Try the stem on the pipe to see how it fits and also how the length looks. When you are first starting out with your stem making, you may want to check the fit while the stem is still in the lathe in case you still need to take a little off the tenon. Fit should be a little tight because the tenon still needs polished and waxed, and that will loosen things up just a touch.

Now I open the air hole at the stem end using a 1/16 inch bit mounted in a Dremel tool. Simply use the bit to fan out the opening. This is not as easy as it sounds and takes some practice to get a straight opening. Second picture shows stem after being opened with drill bit. Another option is to use a circular saw type bit to cut a slit in the end of the stem (picture 3).


I now use various small files to clean up and do a little more shaping inside the air hole.

Polishing the inside of the stem is next. I coat a pipe cleaner with brown buffing compound, then chuck it into my drill press and spin it at 1800rpm. Then simply feed the stem onto the cleaner. I like to start with the bristle type cleaner and then finish with the big soft pipe cleaners.

Now the shaping begins. I start by giving the stem some taper with the sanding disk.


I use a barrel shaped bit in the Dremel to start some buttons. As seen in picture 2 you can hold the end of the Dremel against the stem as you move it back and forth and this will act as a guide to give you perfectly straight buttons. The bit has a tendency to really grab hold and take off so hold on tight.


Now I do some basic shaping with either a file or sometimes an oval shaped burr. Take your time with a burr as it's real easy to take off too much.


I finish the rest of the shaping using various files. First I will use the file to flatten the top and bottom of the stem (area closest to the buttons) until I get the thickness I want. Next I round off the sides to make the stem feel more comfortable in the mouth. Finally I work on the buttons. For button work I have been using an emery board. I like the thick hard foam ones that a different grit on each side. In picture 2 the stem has been shaped and the sanding can begin.

I find it easier to sand while the stem is straight, so I go up to 220grit (picture 1) before bending the stem. In picture 2 I have inserted a pipe cleaner and I am beginning to heat the stem with a heat gun. The stem should be attached to the stummel so you can judge what curve looks best. Take your time with this and keep the stem moving at all times to avoid melting it, especially when using acrylic. When the stem gets softened up enough simply use the pipe cleaner to pull the stem down and get the curve you want and hold it there until the stem cools.


Here I have sanded the stem to 600 grit and am ready to buff it. Acrylic stems need only be sanded to 400 grit and then buffed

I start buffing with brown compound. Picture 2 is after the initial buffing and I will next move to white compound. I buff at 2100rpm and just like in heating the stem for bending you should keep the stem moving to avoid heat build up. Also, don't press to hard on the stem or you can partially melt it, more of a problem with acrylic, but you can easily ruin the buttons on even a vulcanite stem. If you find yourself having to press hard to get out some of the marks in the material you probably haven't sanded well enough. After buffing I use a clean wheel to remove any excess compound left on the stem. With acrylic you could stop here but this stem is vulcanite so I next move to the carnauba wheel and apply a coat of wax over the entire stem.


Finally, buff with a clean wheel and the stem is finished.
